https://www.etsy.com/listing/603049611/entry-bench?ref=shop_home_active_1
Tuesday, April 3, 2018
Wednesday, November 23, 2016

Thursday, August 9, 2012
Sorry folks I have been a bit busy doing summer. I know I said my next project would be this little table.
.JPG)
But I needed to repair this arbor that I had made my wife as a birthday present some years ago


.JPG)
.JPG)
.JPG)


and then I picked up a walnut grandfather clock that someone didn't have time to finish, so I couldn't let that one pass by. I've always wanted one, however I've been lazy and haven't touched it.
But now this came along

This is a TrailCraft 16foot wood and canvas canoe that was built by a friend/coworker of mine back in 1967.
Ron gave me this canoe for my purpose to do as I please.
Well I please to restore it.
This canoe is a beauty with all mahogany wood.
So here goes the reno
.JPG)
Since this canoe is 45 years old trying to get screws out is a chore but I managed to get some wood strips off in order to get to the canvas to strip it off.
.JPG)
This is a picture of the canoe upside down. I took the bottom strip of wood off that is called the keel that exposed the patience one would have back in 1967. Look how many staples there are and how they line up so nice in a row.
.JPG)
I gotta stop this. To many projects. I promised myself I would keep it simple and do one project at a time and not take on another until I was done then this came along

I bought a boat. Here's my new project that needs to be gutted, new seat and new carpet are needed. So this winter I'll be in the garage.
Well folks, i've been in the garage alright putting in a heater so I can work on the boat and lucky I did. I've been a car mechanic in the garage more than I expected. Well here's a pic of how the boat looks now.

As you can see, no carpet and no seats and a bunch of other stuff. We decided to buy new seats and where we couldnt buy new we had new vynal put on.
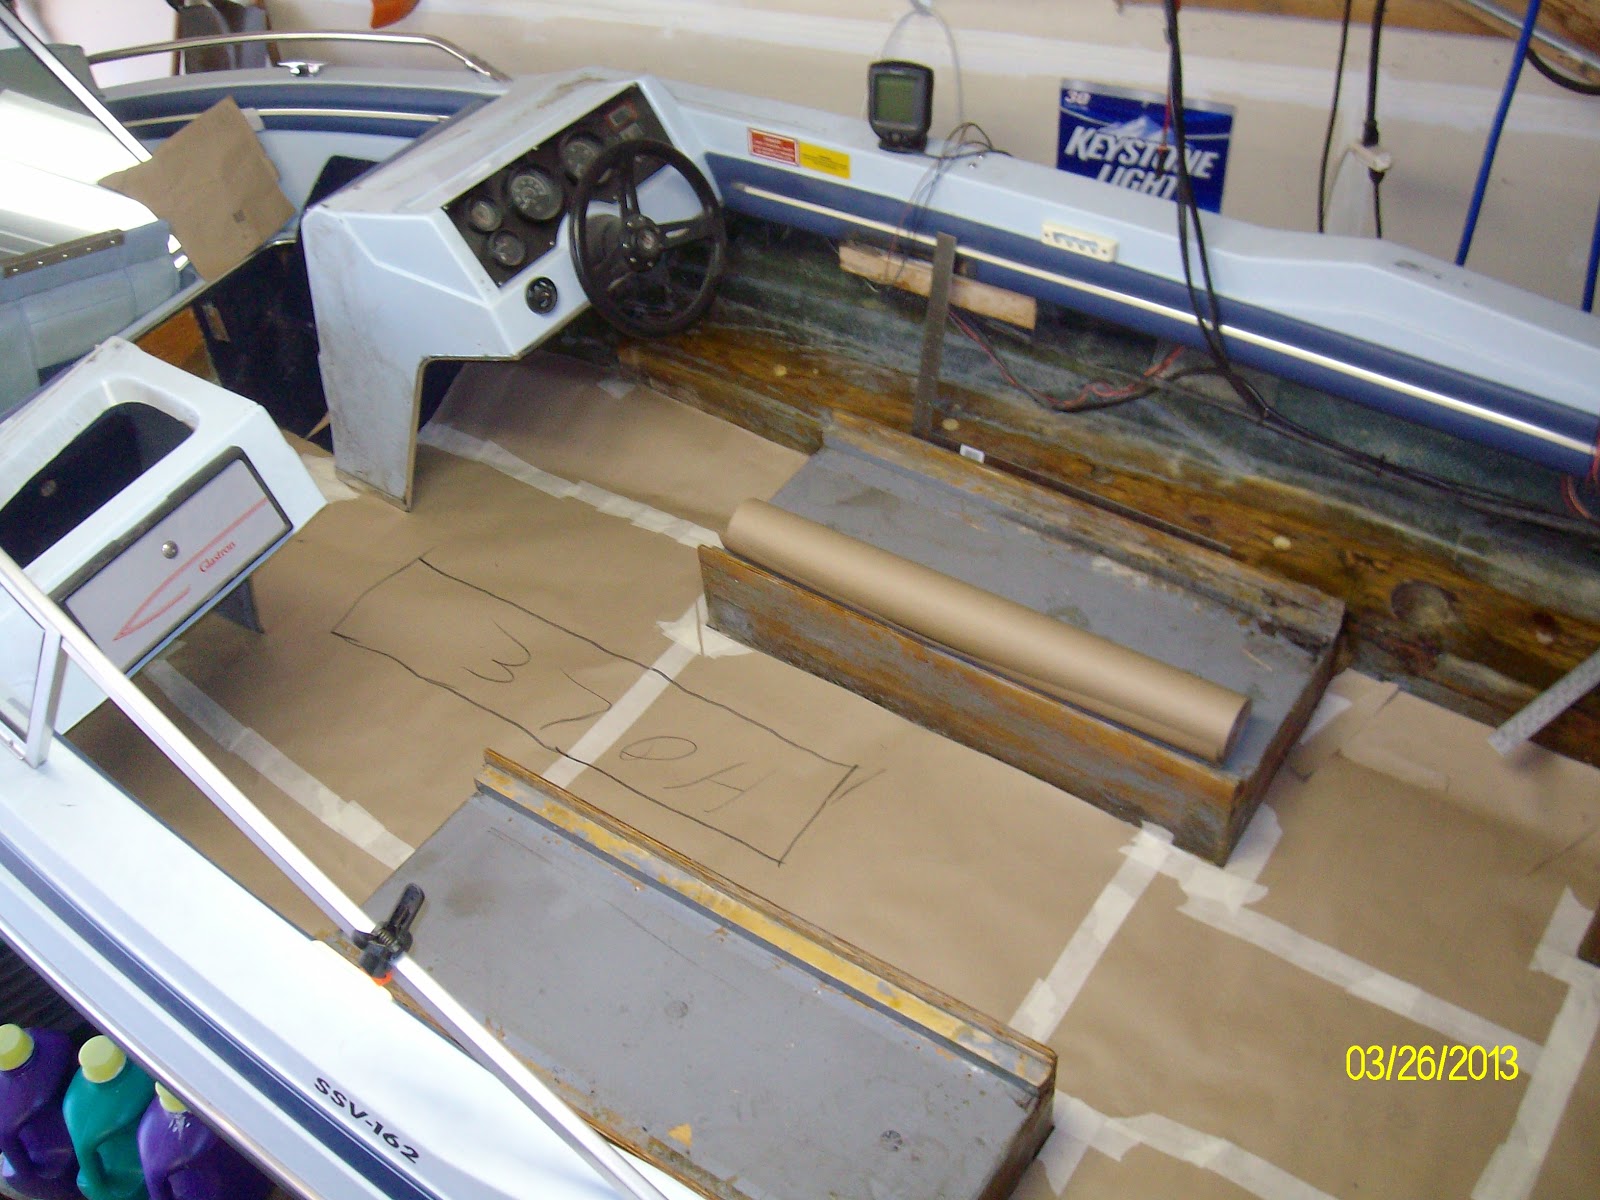
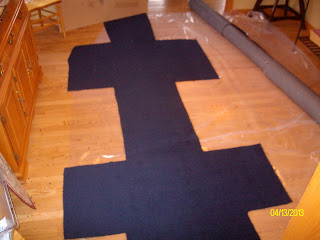
On no, spring is here. I have to get going on this. Well really I have. After taking everything apart and out I had to get all the old glue off from the old carpet. Also some floor repair. After doing all that off to buy carpeting and glue. The carpet is on order and as you can see I made a template out of craft paper and tape. So when the carpet comes in I lay the template on the carpet and cut. We'll see how it goes.

I pulled the template from the boat and layed it up side down on the up side down carpet to cut it. Now to play it on the safe side I cut the carpet one inch bigger per side just in case of fitting problems.

Here's the cut carpet ready to put in the boat and check the fit.
Well I put the carpet in and found the one inch extra was not needed because this carpet is flexible enough that it follows the boats contours well. So I re cut the same carpet to the actual template shape.
I put the carpet back in the boat and it fit perfect.

As you can see I by passed showing where I and my wife have reached finishing the boat.
I will get you all pictures of the interior, believe it or not its not done.
Life gets busy and priorities and rest get in the way but I will get you more pics.
We just figured the boat is finished enough for us to start using it and we just do alittle here and there to it as we have time.
Wow the dreams of enjoying yourself doing the things you like. Instead I have become a car mechanic in my own garage constantly working on my family's car's. Not that I mind to much because I like to fix things but GEEZE it's every weekend.
Update:
Yay Yippie Hooray
I was able to stop my self from going nuts with to many projects.
I met a new metal health professional, Haha, my new Chiropractor.
We got to talking how he wanted to make book shelves that look like a canoe.
Hey Doc I have a deal for you!!!
I have a canoe for you.
The canoe my friend gave me was really neat and I wanted to rebuild it.
But, my ambition was bigger than the priorities I have.
So, I payed it forward .
My Doc picked it up and is going to make two shelf units from it.
I can't wait to see them finished.
Sunday, April 1, 2012
Disappearing wood coin bank
Well folks here we go with a little wood bank I've made in the passed. You can make it any size you would like all that really matters is the little door that makes a coin disappear.
I started out choosing what wood should I use so I chose Aspen. One problem I have with the wood I bought is that it is bowed and cupped. Lucky it is thin and I can bend it in place.


I set up my table saw to cut two pieces of 4 inch and 5 inch pieces.
I used a poor mans stop block to cut consistently.

Grrrrrrr!!!! I forgot the blade thickness, soooo now the bank will be 1/8th smaller from left to right and front to back. Ah the beauty of on the fly engineering.
After I cut all the pieces I layed out the slot for the drawer and using a coin I eyeballed how wide I wanted the drawer to be.
Then I cut and chiseled out the opening


AND HERE IS THE FINISHED BANK


Thursday, March 1, 2012
Next in Line
Here is the next project in store. It is a cute little half table i grabbed just as it was being put out to trash a couple of blocks away from me. I think it will be a good compliment to the chairs.
However I have a gift to make before I get to the table.
I'm going to make a bank for my granddaughter and I am going to show the steps along the way. But anyway here's the table.
Sunday, January 8, 2012
Mr. and Mrs. Claus
So I was enjoying some nice relax time away from my day job browsing some resale shops when I stumbled across Mr and Mrs Claus' chairs. I inspected them closely for wood, wood type and joinery and ah yes, these have some character to them. They didn't have a price tag on them so I went to the front of the store to ask the price. Hey, I noticed a couple of chairs way in the back but there's no price on them, I asked. She replied do they look like Christmas chairs? Why yes they do. They are .25 cents a piece. Huh? Yes, everything that is Christmas is .25 cents. Sold.
 Here's a picture of one of them.
Not bad for .25 cents a piece huh ?
Anyway, Mr. Claus' chair has some joints that were a little loose (wonder why? HOHOHO) and it looked like someone had tried to repair it in the past. So I took the chair apart where the troubled joints were.


I decided to go with a spline joint, it's kind of like a tenon and mortise joint but it's two mortise's and a piece of tenon that fits into both grooves. I hand cut the mortises.
 I had stripped the surface with a scrapper.

 I did some sanding.
 Then it was time for assembly.


.JPG)
.JPG)
.JPG)

.JPG)


Not bad for .25 cents a piece huh ?
Anyway, Mr. Claus' chair has some joints that were a little loose (wonder why? HOHOHO) and it looked like someone had tried to repair it in the past. So I took the chair apart where the troubled joints were.

As you can see it's in piece's. Right after I took it apart I had to decide how I was going to save it.
The joint's were all doweled with glue and supported with corner braces. Well knowing I couldn't redowel to the same sized dowels and there wasn't room for larger sized dowels.


Well in between trying to get back to my chairs I had some other challenges like this little piece of nylon.
It is suppose to look like this piece of nylon

I've been busy repairing this

Ya its my garage door opener, so here's a little progress on the chairs

Here I'm finishing the corner braces by putting a clearance hole in them for screws

Here's a close up of a brace installed and then were ready for painting.

Here's a pic of one of the chair's primed

Ahh, now that looks nice. They got three coats of black paint with my

Wagner spray painter, it works great.
So now to get working on the seat. Hmmm what to do?
Well I decided to go with a seat of texture and not wood. I originally was going to do a hardwood seat but my wife suggested a cloth feel and look, so lets see what she comes up with. In the mean time I get to work on the base of the seat.
First I strip down the old seat.

Lucky I can reuse the spike nuts so I popped them out.

I then traced the old seat on to the 1/2 inch plywood that will be the new seat.

Then because I have two chairs I then clamped two pieces of plywood together and drilled the holes for the nuts.

I then brake out one of my favorite power tools.
Say hello to my little friend!

My little friend went through through this stack of one inch wood like butter.
I then took my file and rounded off the top edge.
Here you see the type of foam I used.

I then traced the wood seat but added an inch extra

Next it was foam cutting time

Then I lay out the fabric to be used that my wife carefully selected
.JPG)
Then lay out the foam and wood evenly on the fabric
.JPG)
Now the next step is a little trick I like to used. I staple the fabric to a couple of stretcher bars. I gives a lot of control of strength and even tension
.JPG)
After you have pulled to gain tension you can hold the bar down on its edge and then you can pivot the bar to hold the tension as you staple the fabric into the seat

This is what the top looks like at this point
.JPG)
Next we move on to the sides and do the same process


Now the hard part, the corners. The first thing to do is open the corner to be like an open flower.

Pull down to the side of the seat and with tension pull any slack you can find from the other front corner and staple to hold the tension in place

Next flip the fabric and do the same thing pulling and stapling to hold

Again open the corner like a flower

Fold in and lay the fabric down and pull fabric toward the center of the seat and staple

I then screwed the seats to the chairs and went from This

TO THIS

Subscribe to:
Posts (Atom)